Food is arguably the most useful resource in this game because without food, it is impossible to support an army. Without an army you are defenseless and cannot protect your other resources from looters.(besides the frustration of getting picked on all the time by people that can house large armies). And without an army you can’t loot others to make up for less-than-sufficient food production.
Even though producing food seems pretty basic, there are lots of things that can be done to improve production, some of which are pretty obvious, while some of them may be a bit more obscure. In order to prosper in this game, you need to know how to maximize your food production. One way to improve production is to research Food Production in your Research Tower.

Key components to high food production:
1. fully upgraded Farmhouses and Flour Mill
2. a Bakery upgraded as much as possible
3. High Public Order and Walls & Towers
FARMHOUSES AND FLOUR MILL:
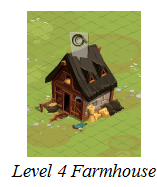


This one really doesn’t need much explanation, just upgrade all of your Farmhouses and your Flour Mill to the highest level you can as soon as you can. One question, however, is just how many farmhouses one should build. The minimum to build is as many as your castle or outpost can give a 100% workload. I normally build the max my castle or outpost can supply at 100% PLUS 8 more. So if I have a 6 food outpost, I would build 14 farmhouses and upgrade them to the highest level I can. This is especially important if you are building up a 2-food outpost.


BAKERY:
Without a Bakery, it is extremely difficult to keep your troops fed, no matter how many farmhouses you have. The Bakery does not actually produce food, it instead reduces the consumption of the food. The downside of the Bakery is that it can only be purchased or upgraded using rubies.

As you can see in the picture above, a Level 1 Bakery reduces food consumption by 5%. Each time it is upgraded, food consumption is reduced by another 5%, so that at it’s highest level (Level 8), the food consumption has been reduced by 40%.
PUBLIC ORDER and WALLS & TOWERS:
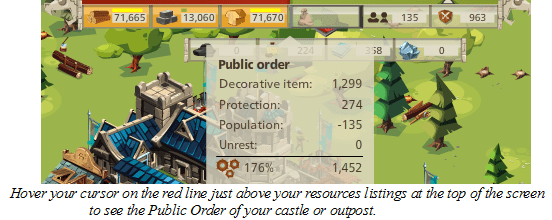
The amount of resource production is dependent on the Public Order in the castle or outpost. Public Order is increased mainly through decorative items which may be built, bought (e.g. with Samurai tokens), or won in various competitions. Some other buildings also increase the Public Order. Public Order in all of my castles/outposts, except my newest which is still under construction, is over 200% and whenever I can get better decorative items, I replace those offering lesser Public Order with the ones offering higher. Additionally, upgrading Walls and Towers not only improves defense, it also increases resource production. Upgrading the Walls and Towers is equally important to Public Order in increasing food and other resource production.
You can build decorative items, and there are lots of ways to get others. In the picture below of an 8-stone/2-food outpost, the fountain to be seen at lower left center was purchased with Samurai tokens. There are a couple of decorative items won in Berimond competitions, and parks and castle gardens from the Decorative items Build menu. The walls and towers are all upgraded to Level 5. The public order is 237%, there are 10 Lvl 10 farmhouses and 4 Granaries, and it is currently producing 1,870.2 food per hour. By comparison, my 8-food/2-wood outpost, which is not nearly so well built up yet, and with a Public Order of only 176%, is already producing 2,614.1 food per hour.

OUTPOSTS
Your food production is limited by what type of outpost you own. Unless you can buy food (or loot it) you should get at least 1 really good food outpost – many level 70 players have all 3 outposts as primarily food outposts.
There are 8 outpost configurations:
6 wood / 2 food 8 wood / 2 food
6 stone /2 food 8 stone / 2 food
6 food / 2 wood 8 food / 2 wood
6 food / 2 stone 8 food / 2 stone

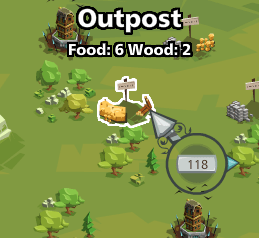
The picture on the left shows an 8-food/2-wood outpost that is currently not owned (i.e.-empty), so it is readily available for capture. The picture on the right shows another empty outpost, a 6-food/2 wood outpost. Note the “glow” around the outpost on the left – this has lead many players to refer to these as “shiny” outposts. They are also sometimes referred to as “Super Outposts”. Only outposts capable of supporting 8 production buildings of one type, whether of food, wood, or stone, have that “glow”.
The numbers represent the number of buildings that can run with 100% load in that outpost. For instance, a 6 food/2 wood outpost will support 6 farmhouses and 2 woodcutters that will all run with 100% workload. If a 3rd woodcutter is built, that woodcutter would have 75% workload / production. The 4th woodcutter would have 56% production and so on – each building having 75% of the workload of the one before it. This same reduction rate applies to all production buildings of any type.
When you are looking on the map for outposts, they will either be owned by someone or they will just be empty. If they are empty, then you can hover over it with your mouse and it will say what type it is.(6-wood/2-food, 8-stone/2-food, etc.) If it is an 8-x / 2-x, it will retain it’s “glow” after it is captured. 
Build Items
A relatively new way to increase food production is with the Build Items. Craft or buy the Build Items for your farmhouses and/or Granaries for a small production increase. In order to upgrade your Build Items, they must be researched in your Research Tower.

And last but not least, A Quick But Temporary Fix
For a quick but temporary increase in production, you can go to the King’s Market and hire an overseer for your food production buildings. It’s relatively cheap for something bought with rubies – 625 rubies for 7 days, and provides a 25% increase in production. The drawbacks are obvious, it costs rubies and is only good for 7 days, but if you are suffering a short-term food shortage, or you are a regular ruby buyer, it can be a really big help.

